How to Set-up Loudspeakers
If you want to guarantee a successful event, here are some important things to consider when setting up a PA System.
Coverage
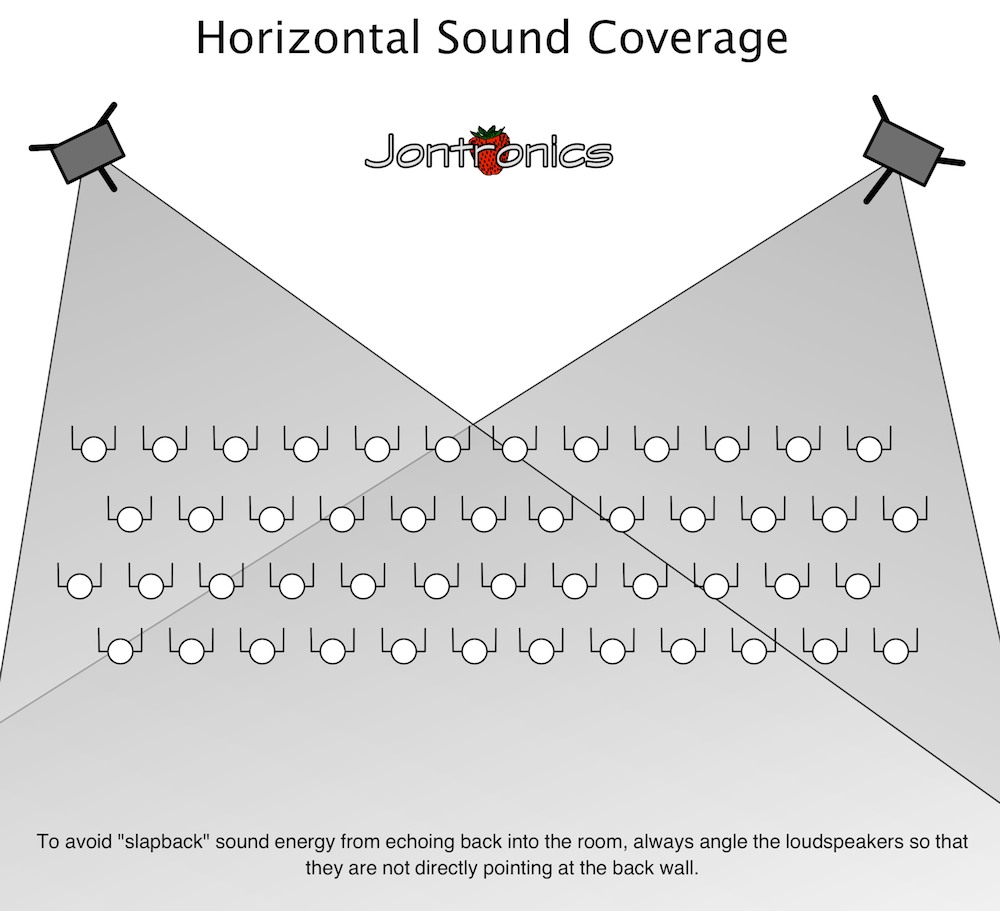
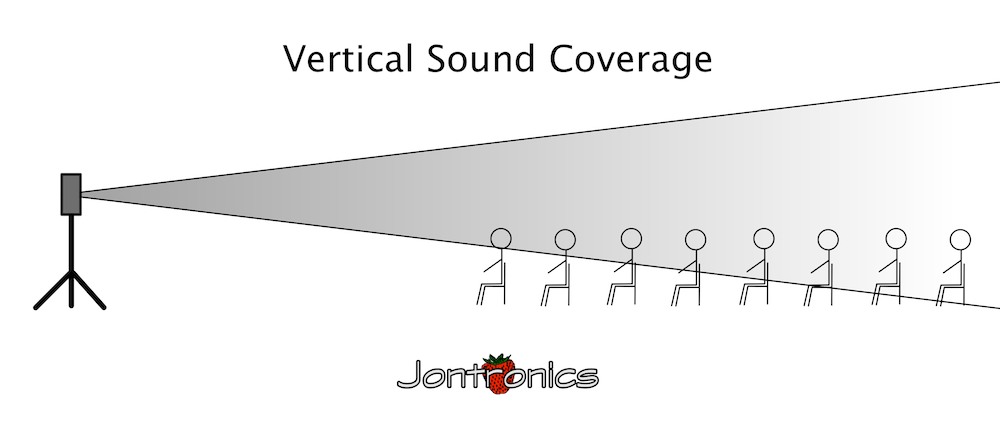
Sound energy emanates from loudspeakers in a shaped pattern (dispersion). The shape varies with each design. Common loudspeaker designs are about 70 ~ 90 degrees horizontal by 40 ~ 70 degrees vertical. (Fig. 1 & Fig. 2)
Those numbers apply to mid and higher frequencies, lower frequencies (think low notes from drums, bass, and organ) are more omnidirectional and will be heard outside of the coverage area.
Higher frequencies are more directional so your audience will need to be inside the coverage area to hear full range sound. Outside the coverage area the sound will be "muddy" and speech intelligibility will be greatly compromised.
Figure 1
Always make sure that the loudspeakers are high enough so that the direct sound to the back of your audience is not blocked by the listeners in the front. Depending on the type of loudspeaker, either use speaker stands or place them up on a stage, sturdy platform, or table.
Figure 2
Bleacher Coverage
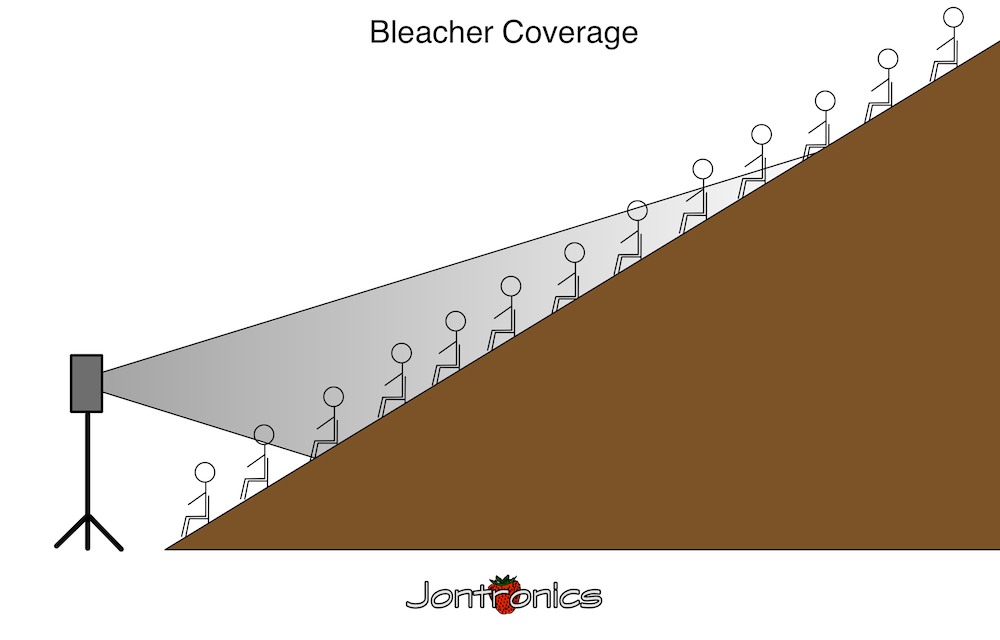
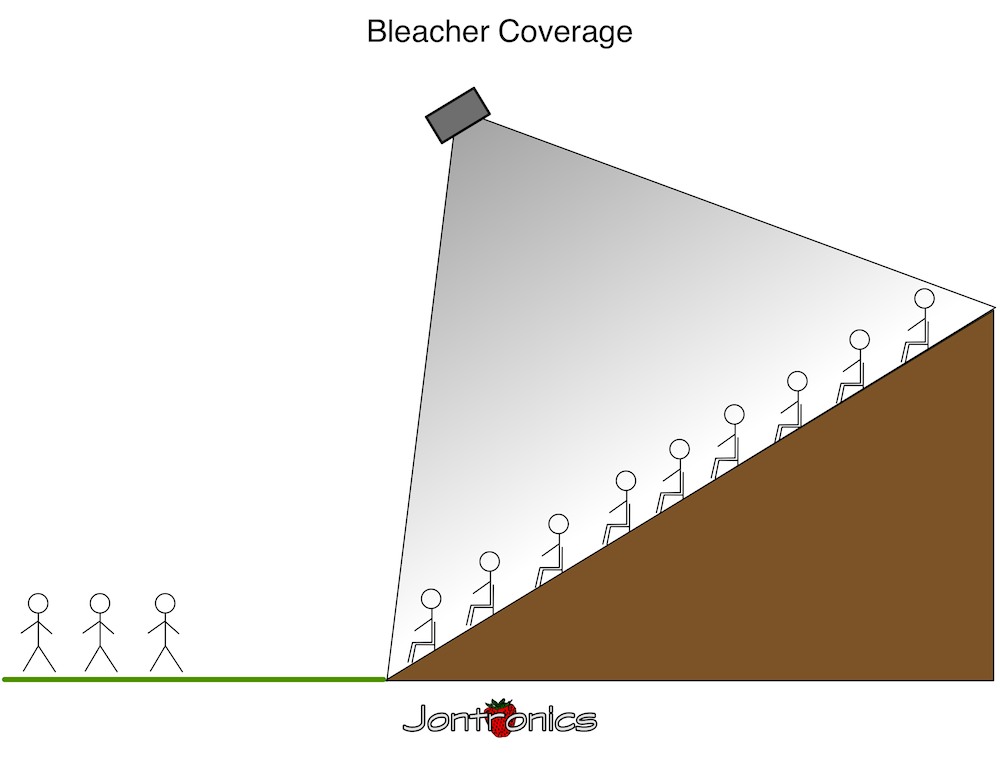
When your seating is high-angle gymnasium or field bleachers, loudspeakers placed at the foot of the seats will usually not have enough vertical coverage to reach the top rows. (Fig. 3)
One solution is to move the loudspeakers further out from the seats to expand the coverage cone, but often that interferes with activities on the ground level and is not really an ideal option.
Figure 3
Loudspeakers mounted above and aimed down at your bleachers is usually the best way to go to get full and even coverage if your audience is seated in bleachers. (Fig. 4)
Figure 4
Reverberation
Controlling sound reflections (reverberation) in rooms with lot of hard surfaces is very challenging. Speech intelligibility will suffer without thoughtful planning.
Always set up your loudspeakers so that they are not aimed directly at any hard surfaces behind your listeners. Soundwaves bouncing off of hard surfaces will come back into your audience and echo the sound that the listeners just heard. This will result in smearing of the sound and greatly diminish intelligibility. Just a simple angling of the loudspeakers (see Fig. 1) will reduce sound reflected back into your audience.
Covering hard surfaces with acoustical absorption and diffusion materials is very effective in controlling reflections.
Try to keep the sound level at the minimum level required. At a certain point in a highly reverberant room, more volume will only reduce intelligibility.
Reducing unnecessary low frequencies helps eliminate a lot of the reflected energy. Turn down the bass (below 100-150 Hz) for anyone talking on a microphone.
Feedback
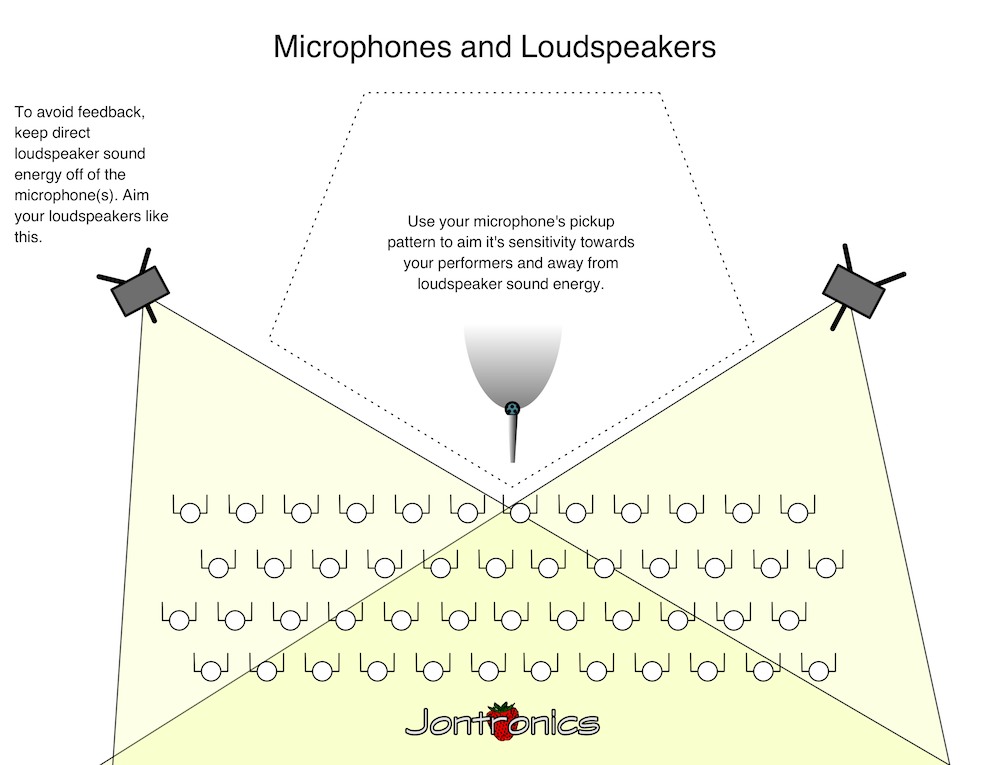
Controlling feedback when using microphones in a live sound event is easy if you follow some basic rules. The high pitched squeal is caused when the microphones pickup the sound energy from the loudspeakers and reamplifying until it becomes a runaway loop. It is hard on the ears of your audience plus it can damage to your loudspeakers.
Figure 5 diagrams some good practices to adhere to when setting up your event.
Feedback and the Number of Open Microphones
The more microphones that are on and "open", reduces the maximum volume that you will be able to run your system. Everytime that you double the number of live microphones you will reduce the maximum gain (volume) before feedback by 3 dB. During an event try to keep the number of open microphones to the minimum that you need at any moment. Turn off the microphones for performers during moments they are not performing. For example try using one or two well positioned mics on a choir, rather than four. You will be surprised that less will often sound better than more. For individual performers, try to use microphones with cardioid or hypercardioid pickup patterns. Get them to practice good microphone techniques, aimed and positioned so it picks up the best sound quality. Use your ears for best results.
Feedback and Room Modes
Room modes are frequency buildups that happen due to loudspeaker energy resonating inside a room. If you place a microphone in a location where frequencies are building up due to room modes and you will get feedback at lower volumes than at other spots in the same room. Rooms with lots of reflective surfaces are the most problematic. Sound diffusion and, sound absorption treatment are the best fixes, but if that is not possible slight changes to loudspeaker placement and aiming will do wonders on a tight budget. Careful microphone positioning will also result in significant gain before feedback improvements.
Figure 5
Sound System Output
The next thing to consider is how large of an area your audience will be occupying. Depending on the venue you will need to decide how powerful and how many loudspeakers you will need to get the job done. Always size your system for the largest area that you will need to cover. A powerful PA system can always be turned down for smaller venues and events, but a light-duty one will usually fail when pushed to do more than it was designed for.
As we all know, as you move closer to a loudspeaker, it get louder. Ideally your listeners shouldn't be too close or too far from the loudspeakers.
In a large venue your furthest listeners could be a hundred feet or more from the loudspeakers. Loudspeakers that are capable of projecting sound to that distance are very loud up close, so you will need to make sure that they are set up so they are not too close to any of your listeners near the front. If your venue limits your loudspeaker setup, using additional loudspeakers (Fig. 6) halfway back on a delay might the better route to go.
It is usually not a good idea to place a second set of loudspeakers (with the exception of surround effects) at the back of the room, especially if no delay is used. When the action is up on the stage while the sound is coming from the rear, almost always results in audience listening confusion and poor speech intelligibility.
Figure 6
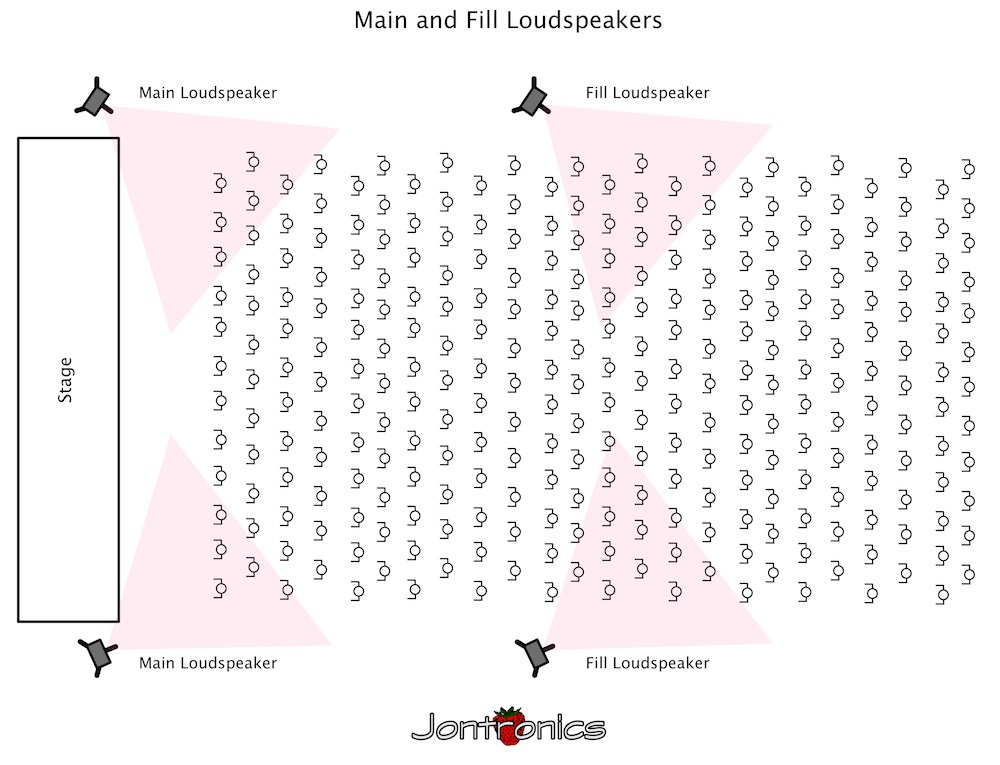
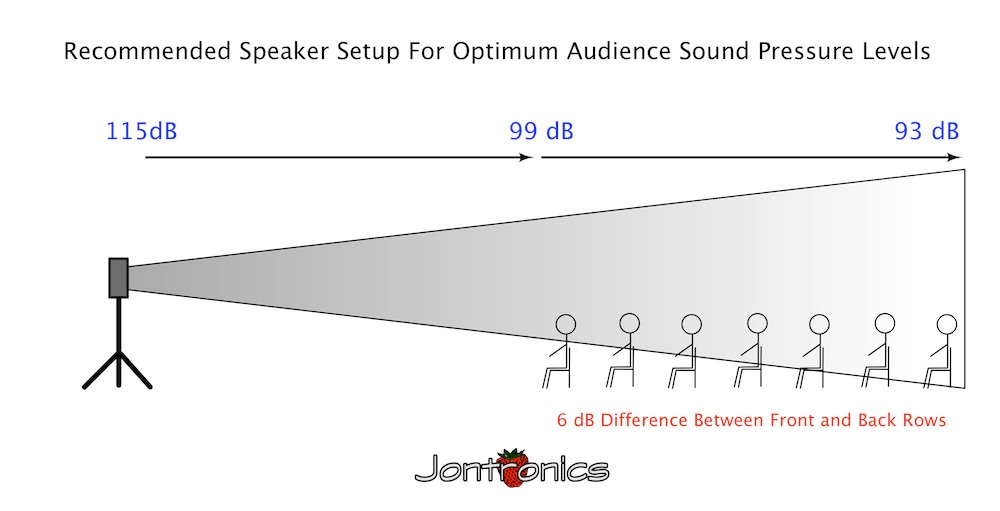
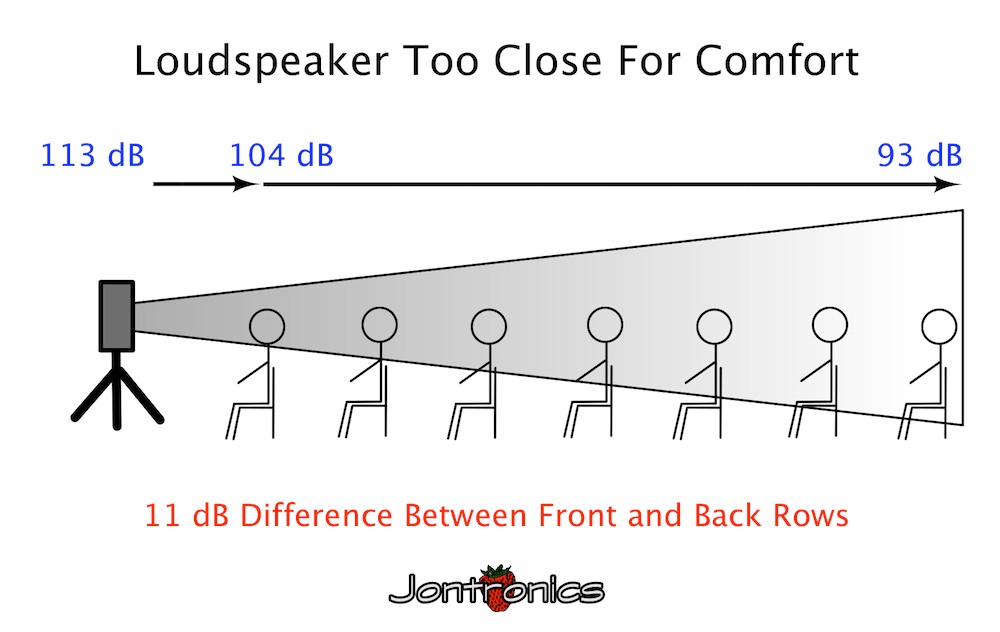
Fig. 7 shows what happens when you set your loudspeaker up too close to the front row. In order to have adequate volume for the back row of the audience, the front row will be experiencing uncomfortable volume levels. The next diagram (Fig. 8) shows a more practical setup.
Figure 7
By moving the loudspeaker further back (Fig. 8), your front row audience will get comfortable sound levels, while still providing enough level for the back row to hear. The loudspeaker will be putting out more output, but by the time it reaches the front row the sound will be at a comfortable level.
Figure 8
